Finishing the Drywall Ceiling allows creating almost any shape: various bends, figured and multilevel solutions. It is able to hide irregularities, engineering communications, electrical wiring. The loss in the height of the room from such a ceiling is small. It all depends on the structure and design decision.
Especially relevant, consider the advantages and disadvantages of this popular building material.
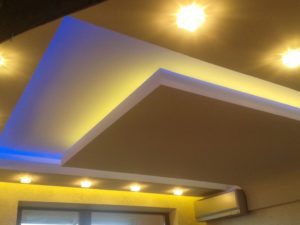
Advantages of Finishing the Drywall Ceiling:
- Is able to equalize any defects and unevenness of the ceiling. There is no need to additionally plaster the surface.
- Is able to hide the existing wires, beams, pipes, etc.
- Create complex lighting options.
- Creating any forms, niches for lighting, a different number of levels – all this can be done with gypsum plasterboard.
- Allows you to hide heat and soundproof materials.
- The process of working without unnecessary pauses – there is no need to wait until the surface of the ceiling dries.
- Lightweight construction.
Disadvantages of Finishing the Drywall Ceiling:
- Loss in the height of the room. It depends on the curvature of the surface and the complexity of the design.
- Relatively complicated installation process.
It is worth noting that the drywall is afraid of moisture, so it is rarely used for finishing the bathroom.

Installation of Drywall Ceiling
For the installation of the frame of a suspended gypsum board ceiling, a cold-formed metal profile is used. The use of thinner profiles can contribute to the deformation of the whole ceiling design. Two types of profiles are used in the fabrication of the frame: lightweight joint compound and setting-type joint compound. During installation, most of all, spring suspensions, various connectors are also used.
First of all, we’ll think about what we need from tools and materials.
Required Tools
- 4-in-1 screwdriver
- Drywall sander
- Dust mask
- Mud pan
- Sanding block
- Sanding pole
- Taping knife
- Utility knife
Required Materials
- 120 grit drywall sandpaper
- 120 grit sanding sponge
- Drywall tape
- Lightweight joint compound
- Setting-type joint compound
- Stain-blocking primer
Impressive list, right?
Finally, this need to buy.
Preparation of Drywall Ceiling for painting:
- First, the ceiling must be primed. Preferably with an acrylic primer.
- After the primer has dried, begin to seal the starting filler joints and self-tapping screws.
- After drying putty, we paste the seams with a serpent.
- Again starting filler joints to get one plane with the ceiling.
- The entire fiberglass canvas is glued to the entire ceiling. It can be glued with glue for fiberglass wallpaper.
- After the glue dries, apply the starting putty and after drying the finish.
- Clean the ceiling with sandpaper until the condition is smooth. Priming the surface.
- You can proceed with direct painting (at least 2 layers).
As a result, you will have a wonderful ceiling!

In addition, drywall can break. You can watch the video and find out How to Repair a Cracked Drywall Ceiling:
Conclusion
In conclusion, the finish of the ceiling with Drywall is rather complicated, and if it is a multi-level ceiling with extraordinary lighting – even an artistic one. Such work has many nuances, details and other options that affect the result.
Perhaps you can paint the ceiling itself. But what about plasterboard? Most of all we are sure that it will be difficult. Can then entrust hard work with Drywall to professionals?
Paint City offers a complete set of painting solutions and services for residential, commercial and industrial customers.
We work in Vancouver, Coquitlam, Barnaby and Whistler.
We will be grateful if you appreciate our article.
[ratings]